How one point creates depth
Imagine looking straight down a long hallway. The edges where the walls meet the floor seem to move closer together in the distance, even though the hallway does not actually narrow. One-point perspective uses that visual effect to make a flat drawing feel three-dimensional.
The method works especially well when you face a scene straight on, such as a hallway, a room’s back wall or a road stretching ahead. Lines that travel away from you appear to head toward one place on the page: the vanishing point. Lines across surfaces facing you can stay horizontal, while upright edges stay vertical. Knowing which lines change direction is the key to making the drawing believable.
Set up your horizon and vanishing point
Start with a pencil, paper, eraser and ruler. Draw a light horizontal line across the page. This is the horizon line, which represents your eye level. It does not have to show up in the finished picture. If your eye level is low in the drawing, you may see more of the tops of objects; if it is high, you may see more of the floor.
Choose one spot on the horizon line and mark it with a small dot. That is your vanishing point. For a first attempt, place it near the middle of the page. You can move it to one side in another drawing, but keep the same vanishing point for lines that recede in the same direction. Use light pencil marks: these are construction guides, not necessarily part of the final scene.
Draw a simple room, step by step
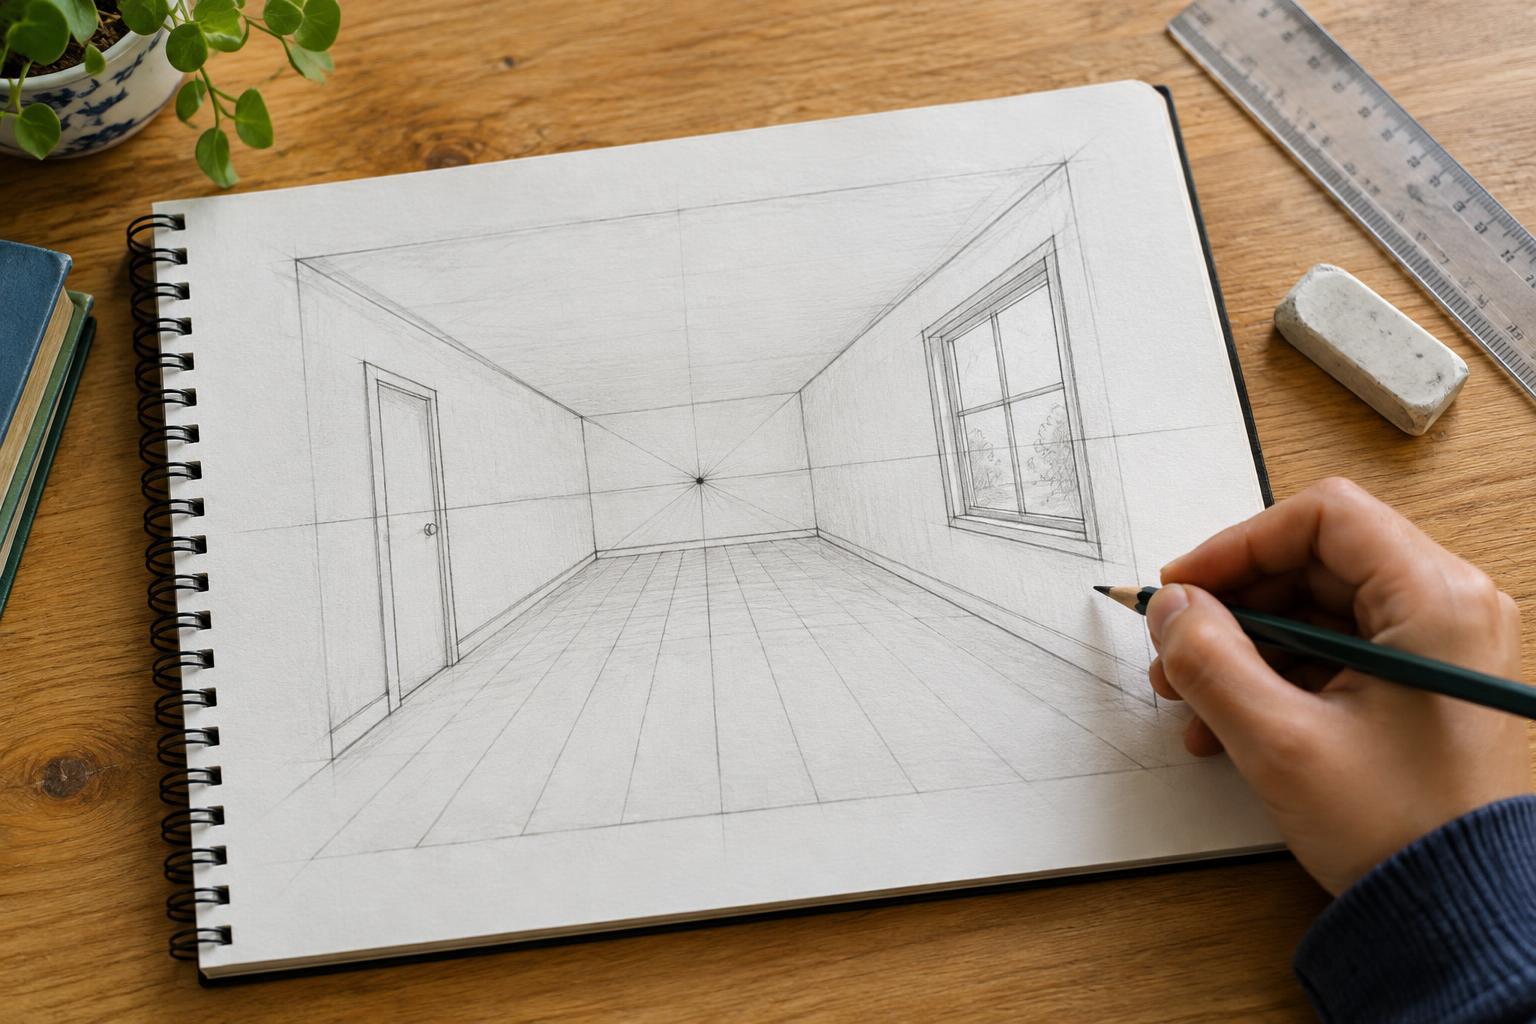
Draw a rectangle around the vanishing point to make the room’s back wall. Leave space between the rectangle and the edges of your paper. From each corner of the back wall, draw a light line toward the nearest corner of the page. The areas between the rectangle and the page edges become the ceiling, floor and side walls. You can darken the room edges once you are happy with their positions.
Add a door on the back wall with straight vertical and horizontal sides. Because that wall faces you, the door can look like an ordinary rectangle. Next, add a window on a side wall. Draw its near vertical edge first, then use guide lines toward the vanishing point to place its top and bottom edges. A farther vertical edge closes the window. Its far edge should generally look shorter than its near edge.
For floor tiles, draw several lines from the bottom edge of the page toward the vanishing point. Then add lines across the floor to divide the tiles into rows. Place the farther rows closer together to suggest distance. There is no need to fill every surface with details; a few clear features will make the room easier to read.
Check which lines go where
A common beginner mistake is aiming every line at the vanishing point. Only lines going away from you in the scene should converge there. The upright edges of a door or window remain vertical. The top edge of a picture frame on the back wall remains horizontal. If a shape looks twisted, ask what direction each edge would travel in the real room before changing it on the page.
Another useful check is size. Repeated objects, such as lockers along a hallway, should generally appear smaller as they get farther away. You can sketch the nearest locker first, then use light lines from its top and bottom toward the vanishing point to help place smaller ones behind it. Keep your guides faint so you can erase them without losing the parts you want to keep.
Practice by changing one thing
Once you have drawn a room, try the same setup as a path between two rows of trees or a street viewed straight ahead. Keep the horizon and vanishing point, but replace walls with features that suit the new scene. This helps you understand the method rather than memorize one picture.
For a second room drawing, move the vanishing point off-center. Notice how that changes the amount of each side wall you can see. If the result feels awkward, treat it as useful information: compare the edges that recede, adjust a few guides and try again. Perspective is a tool for planning space, not a test of whether you can draw perfectly on the first try.